CI/CD Management as Part of the DevOps Automation
CI/CD Pipeline
Net Core Genesis uses Drone as the delivery backbone subsystem. It’s open source, GO-based, lightweight, supports Docker and cluster installations.
There’s rich ecosystem of pipeline plugins, with a growing support community as well as paid enterprise hosting and support options.
Drone is a versatile flexible container-native continuous delivery platform, and is a more flexible and adaptable option compared to existing rather complex platforms like Jenkins, Travis, etc.
Note: We will support the following CI/CD backbones in future releases:
- Jenkins
- TFS
- VSTS / Azure Devops
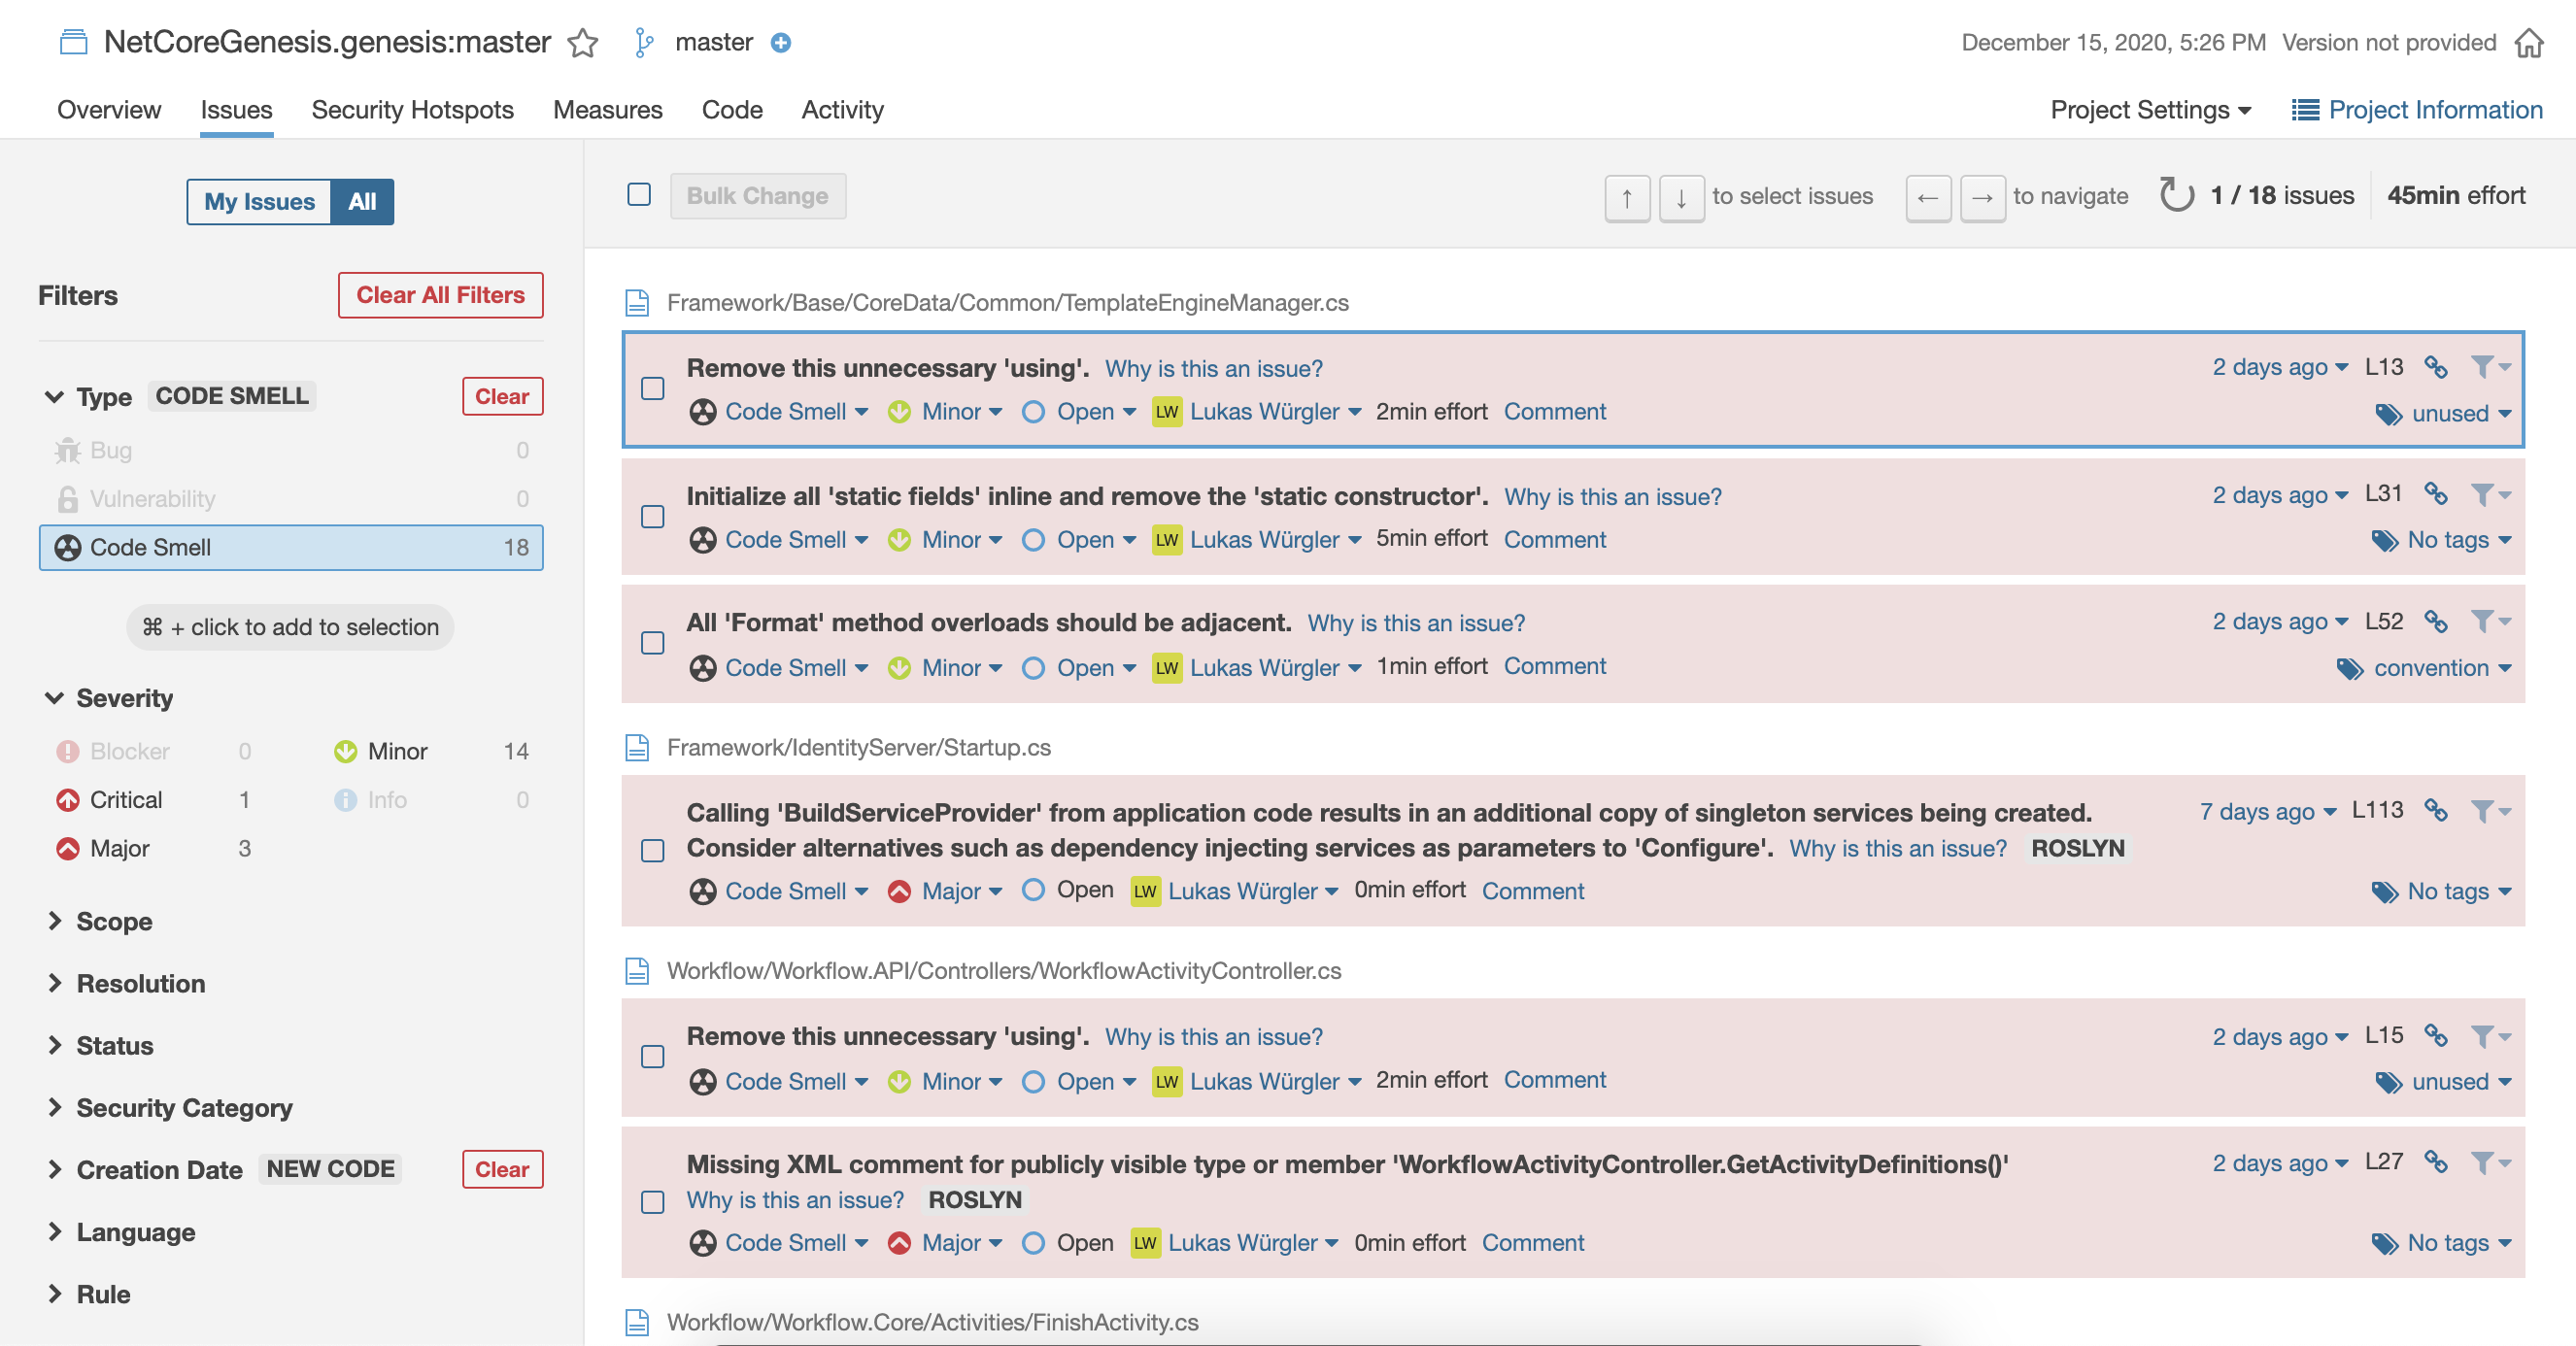
Code Review and Analysis
Genesis' DevOps automation also performs continuous inspection of code quality to perform automatic reviews with static analysis of code to detect bugs, code smells, security vulnerabilities, and reports them.
It covers a wide area of code quality checkpoints ranging from styling errors, potential bugs, and code defects to design inefficiencies, code duplication, lack of test coverage, and excess complexity.
SonarQube is an open-source platform for continuous inspection that has become more or less the industry standard. Because it is covering the most popular 27+ programming languages, it’s the most complex solution that covers most use cases using a single application. This allows you to not use a separate app for every programming language that has to be analyzed.
Code Inspection Report
Source Code Repository Integration
Through Drone, comes various supported source code repository integrations out of the box (GitHub, GitHub Enterprise, GitLab, Bitbucket Cloud, Bitbucket Server, Gitea, Gogs)
To be integrated to Genesis' CI/CD pipeline, please follow the instructions below and provide the OAuth Key and Secret
1) Create an OAuth Application
GitHub Integration
The Consumer Key and Consumer Secret are used to authorize access to GitHub resources.
The authorization callback URL must match the below format and path, and must use your exact server scheme and host.
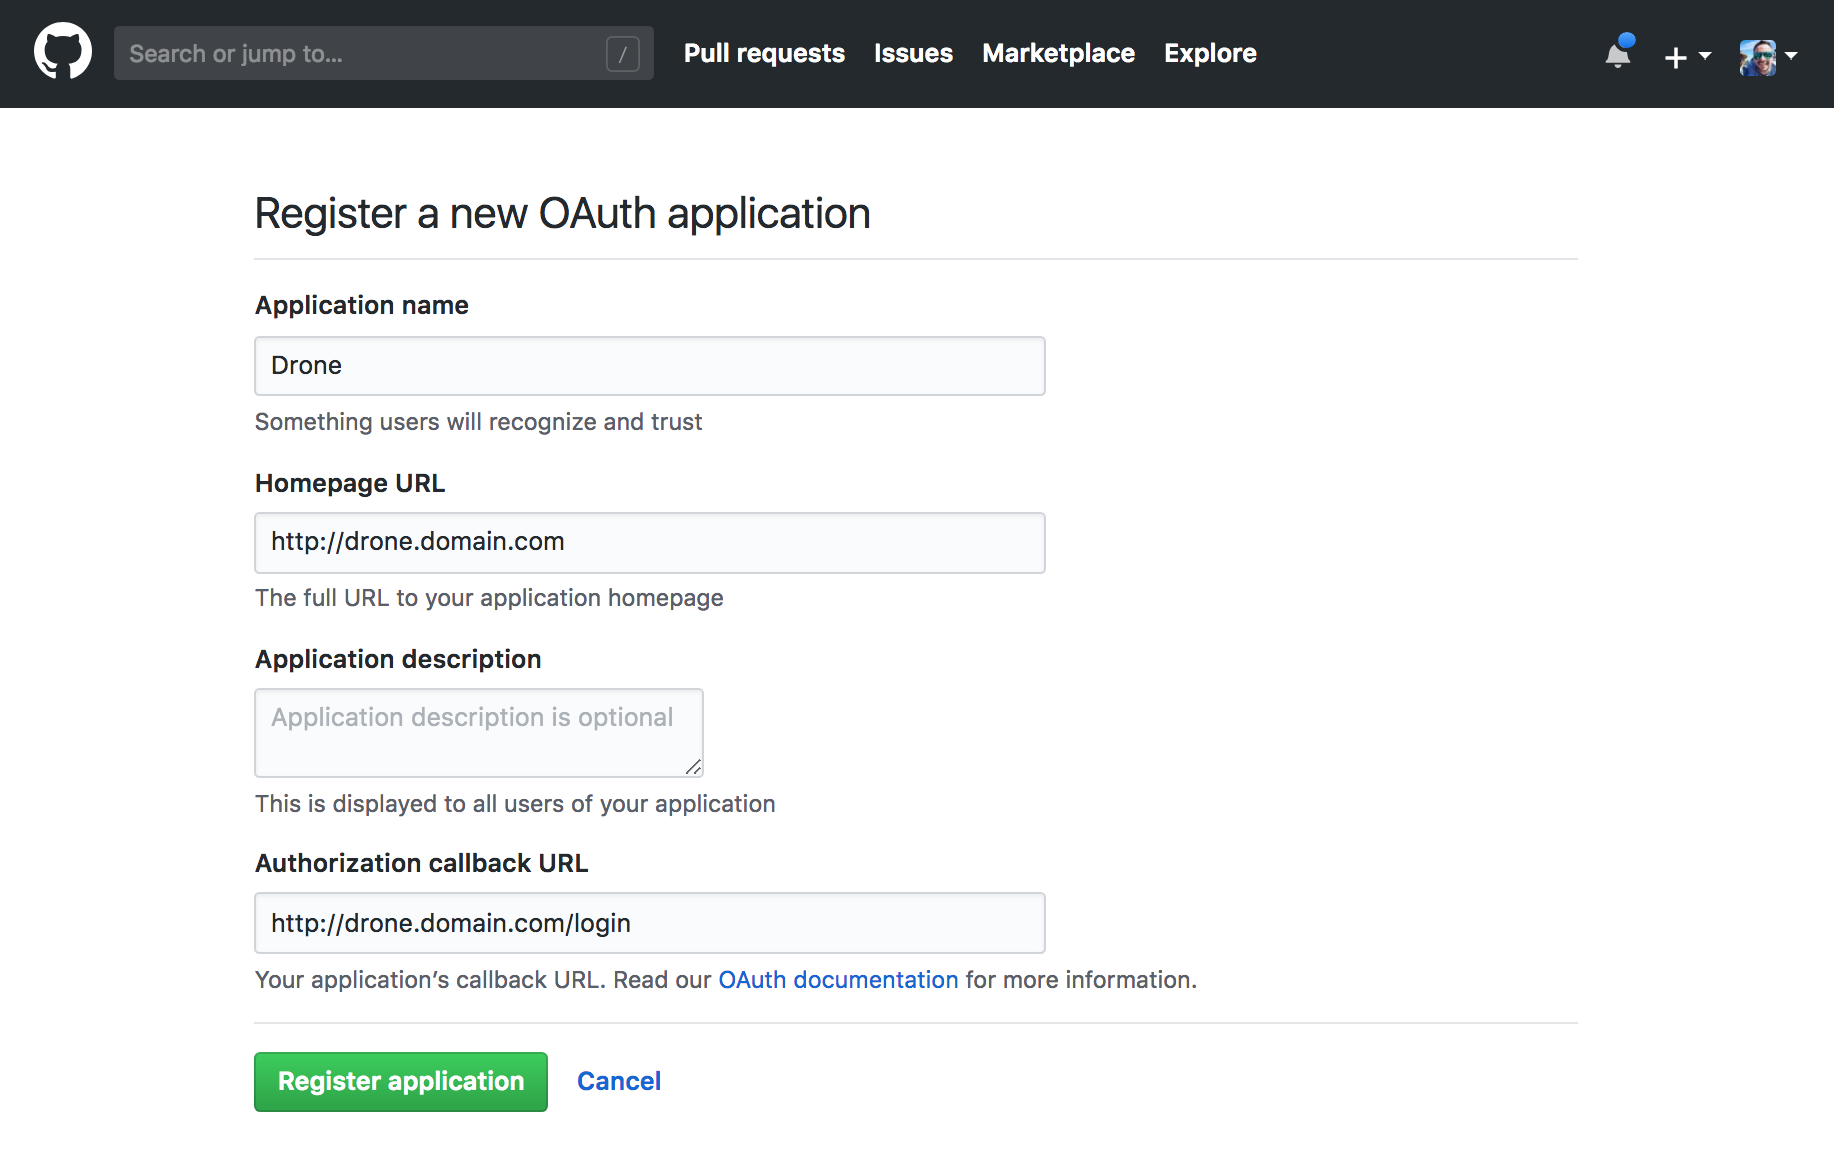
For details, check https://docs.drone.io/server/provider/github/
Bitbucket Integration
The Consumer Key and Consumer Secret are used to authorize access to Bitbucket resources.
The authorization callback URL must match the below format and path, and must use your exact server scheme and host.
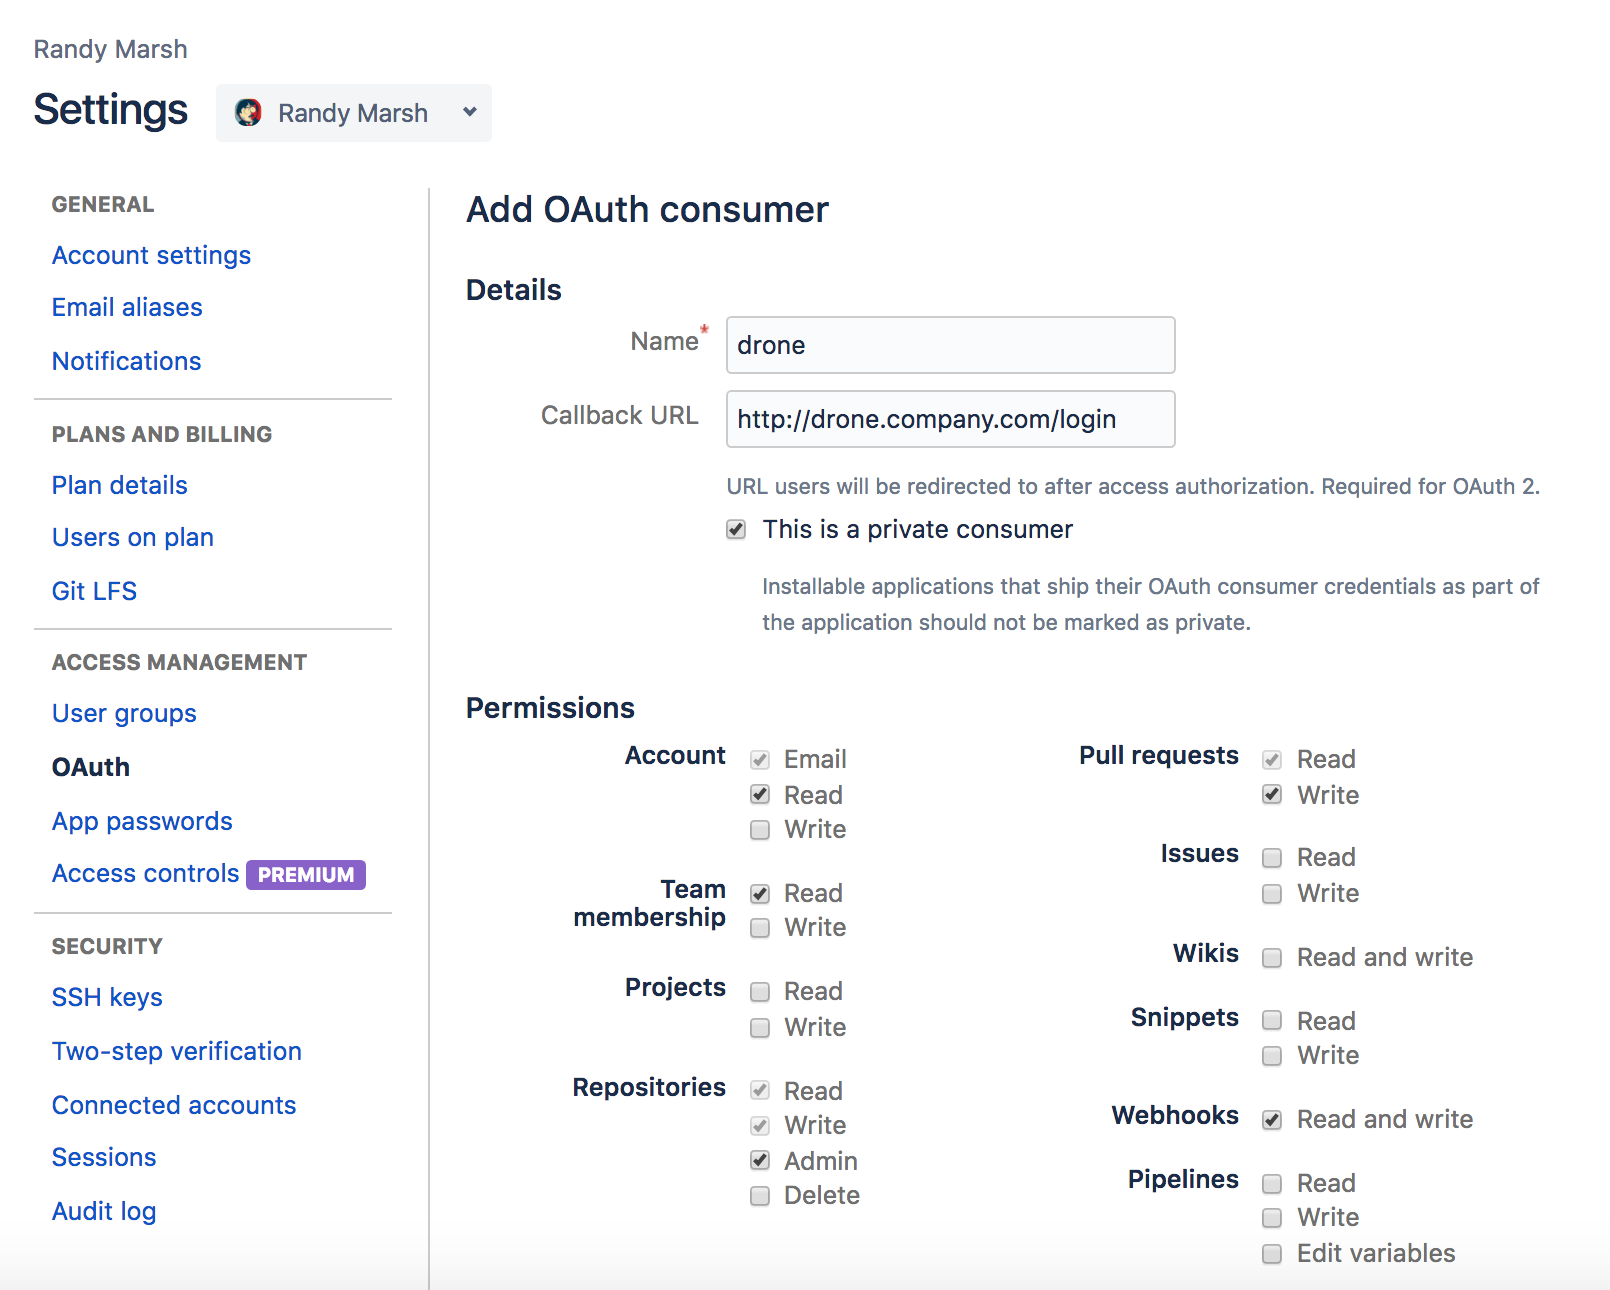
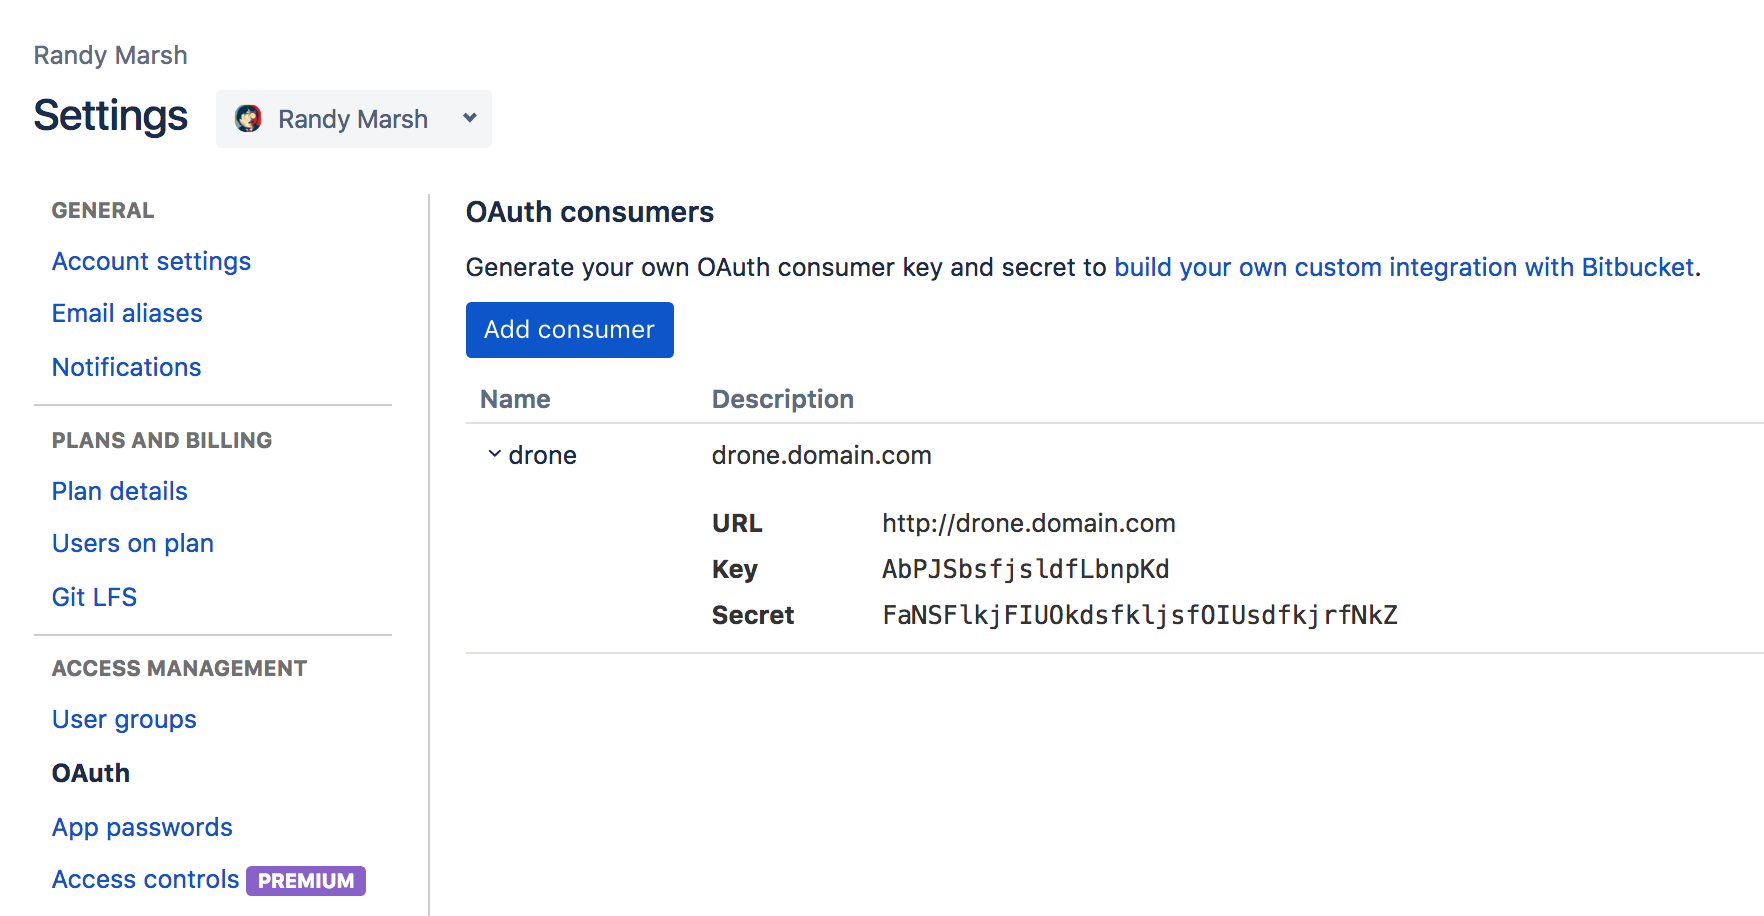
For details, check https://docs.drone.io/server/provider/bitbucket-cloud/
GitLab Integration
The Consumer Key and Consumer Secret are used to authorize access to Bitbucket resources.
The authorization callback URL must match the below format and path, and must use your exact server scheme and host.
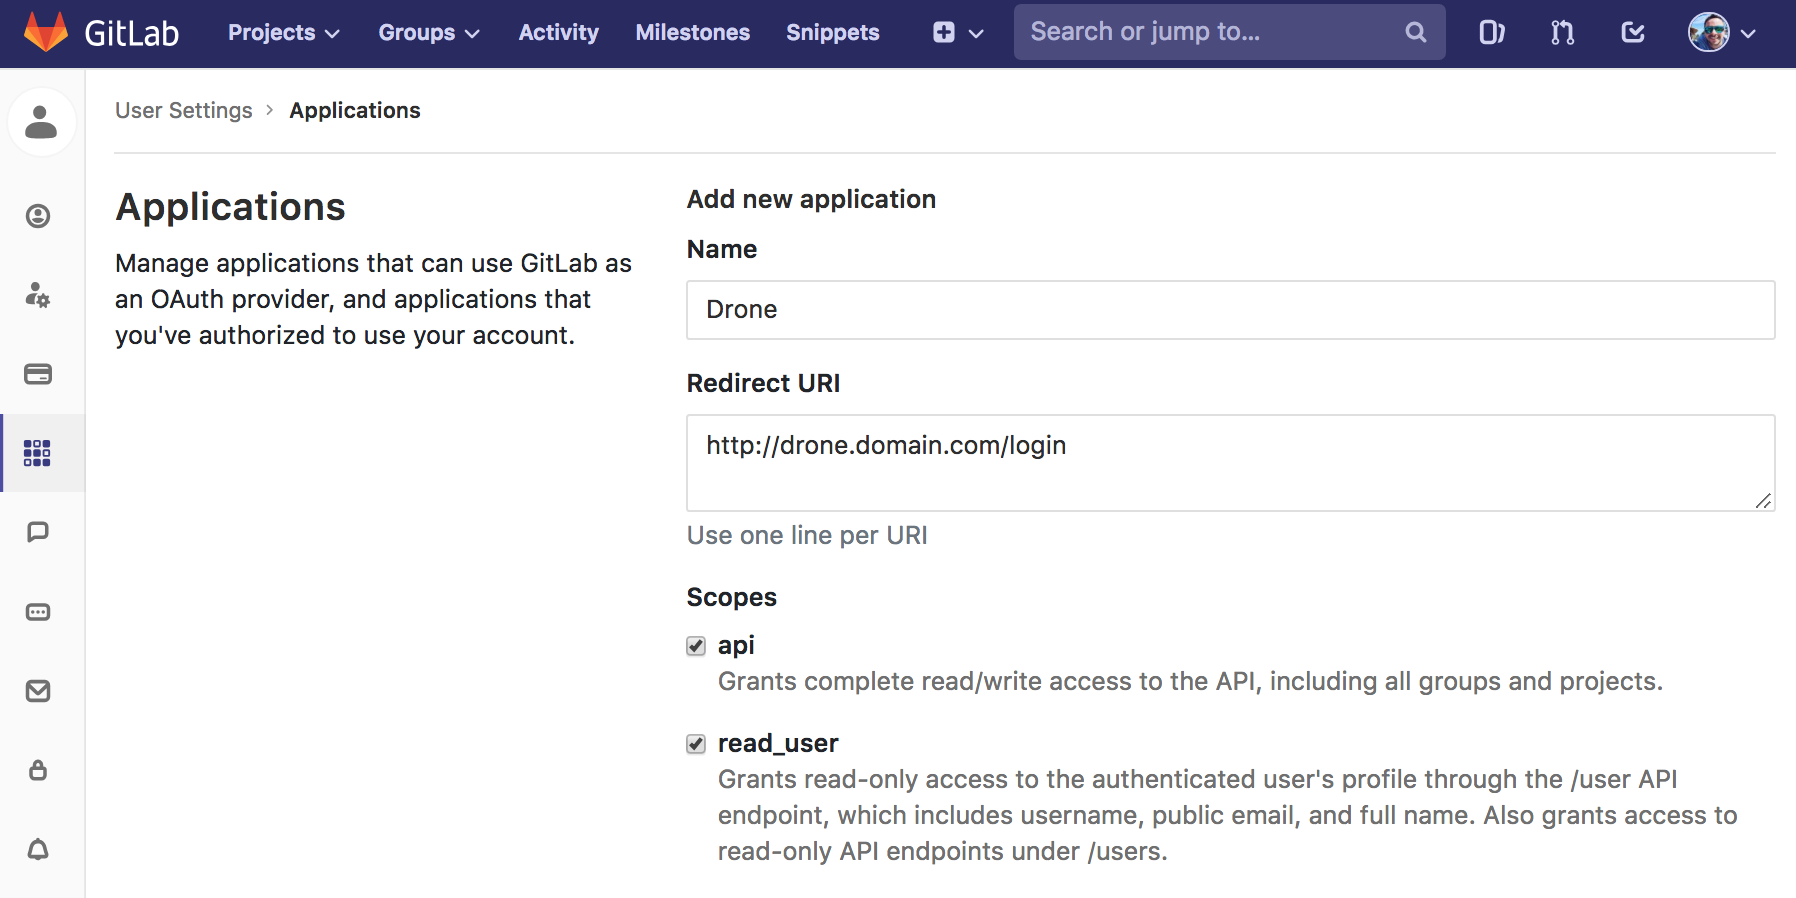
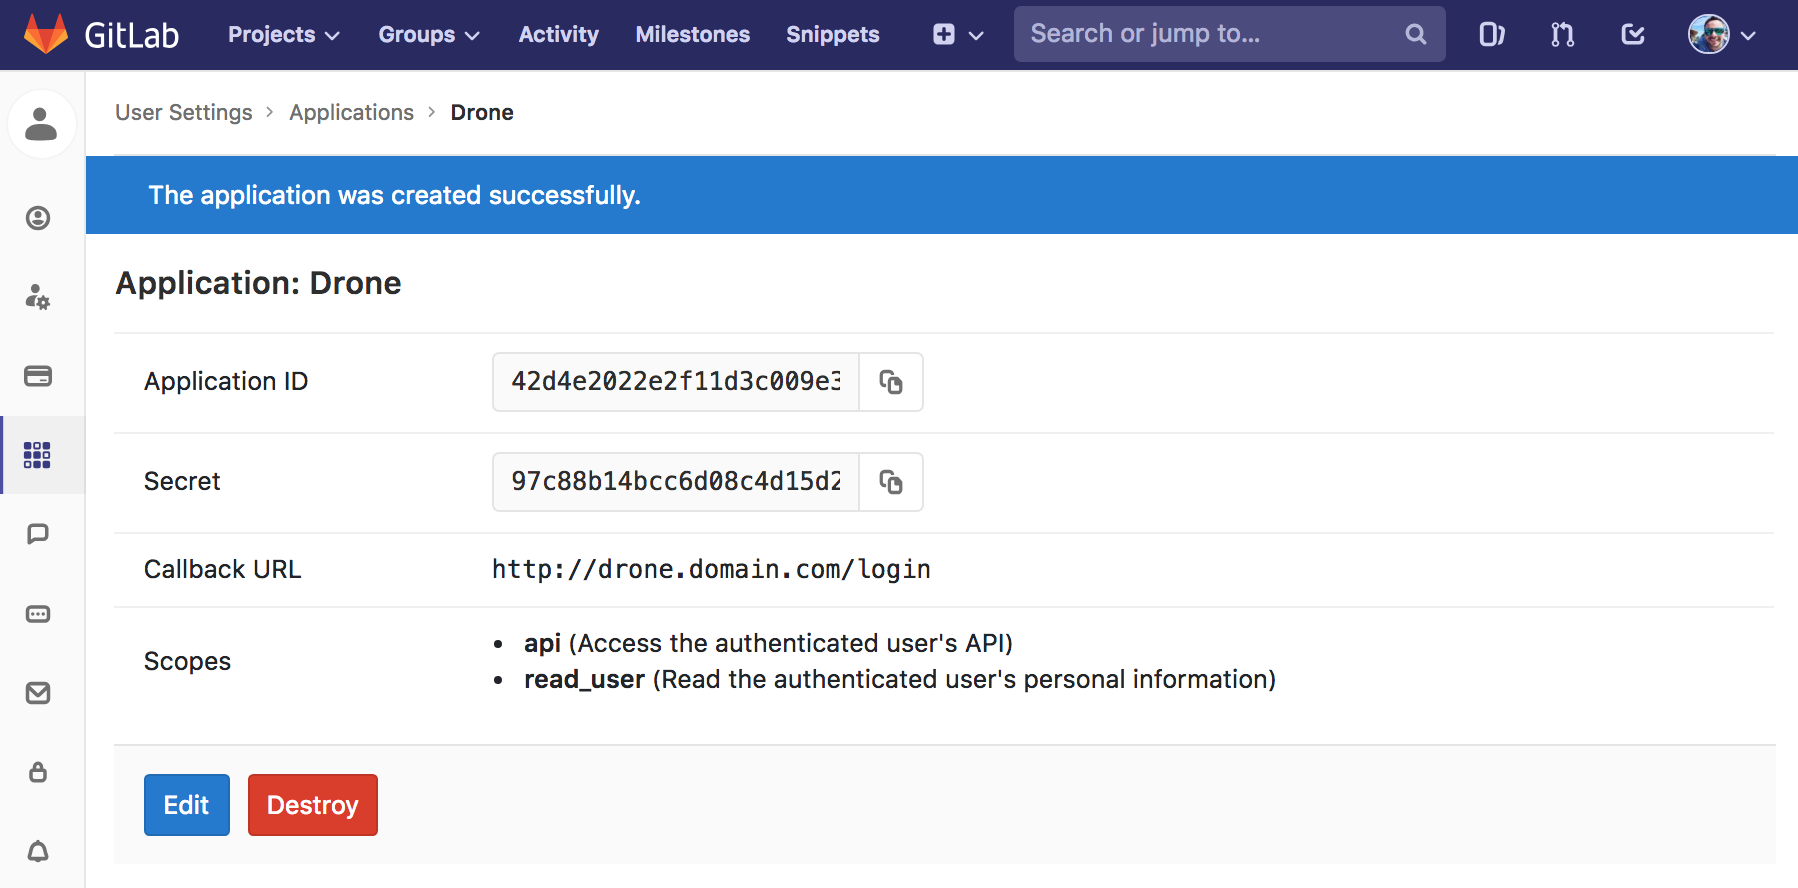
For details, check https://docs.drone.io/server/provider/gitlab/
Other Source Control Management provider integrations
- https://docs.drone.io/server/provider/github-enterprise/
- https://docs.drone.io/server/provider/gitea/
- https://docs.drone.io/server/provider/gogs/
- https://docs.drone.io/server/provider/bitbucket-server/
2) Create subdomain
Create your subdomain (such as deploy.yourdomain.com) for administration panel and route it to 94.237.80.209
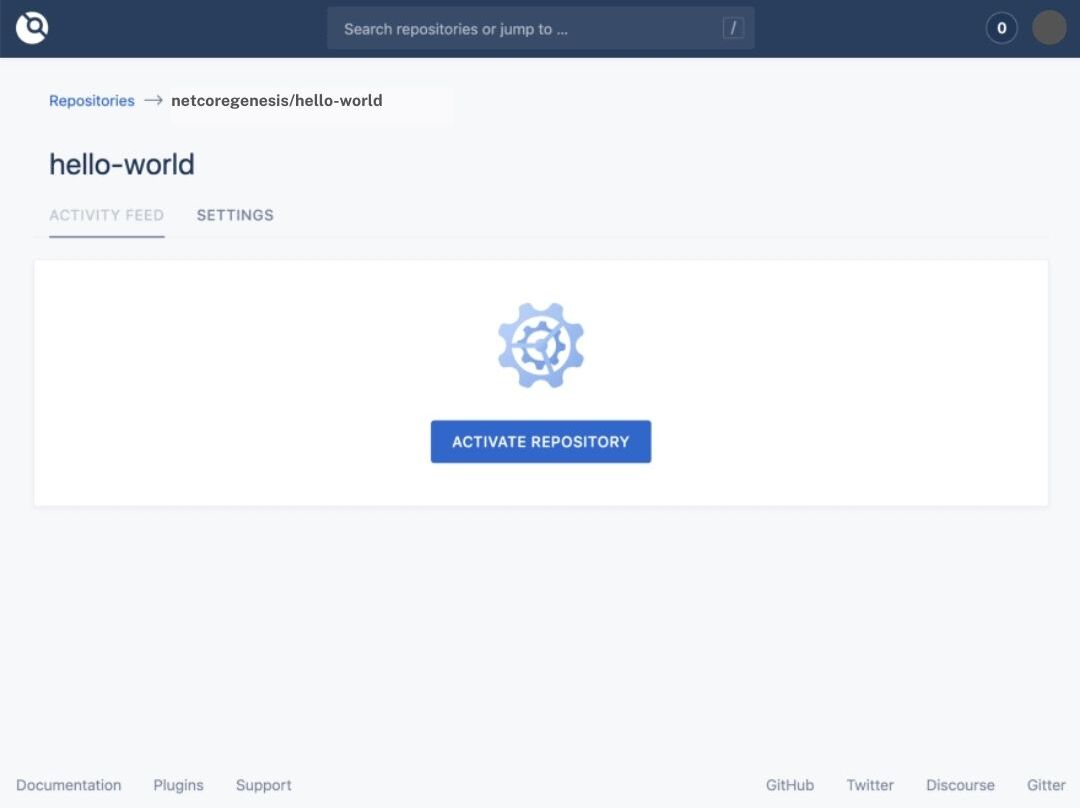
3) Activate repository
Go to the CI/CD panel at deploy.yourdomain.com, choose the repositories one by one to be integrated and click Activate Repository
Important!: The user who enables a repo must have Admin rights on that repo, so that the webhook can be added.
Note that manually creating webhooks yourself is not possible. This is because webhooks are signed using a per-repository secret key which is not exposed to end users.
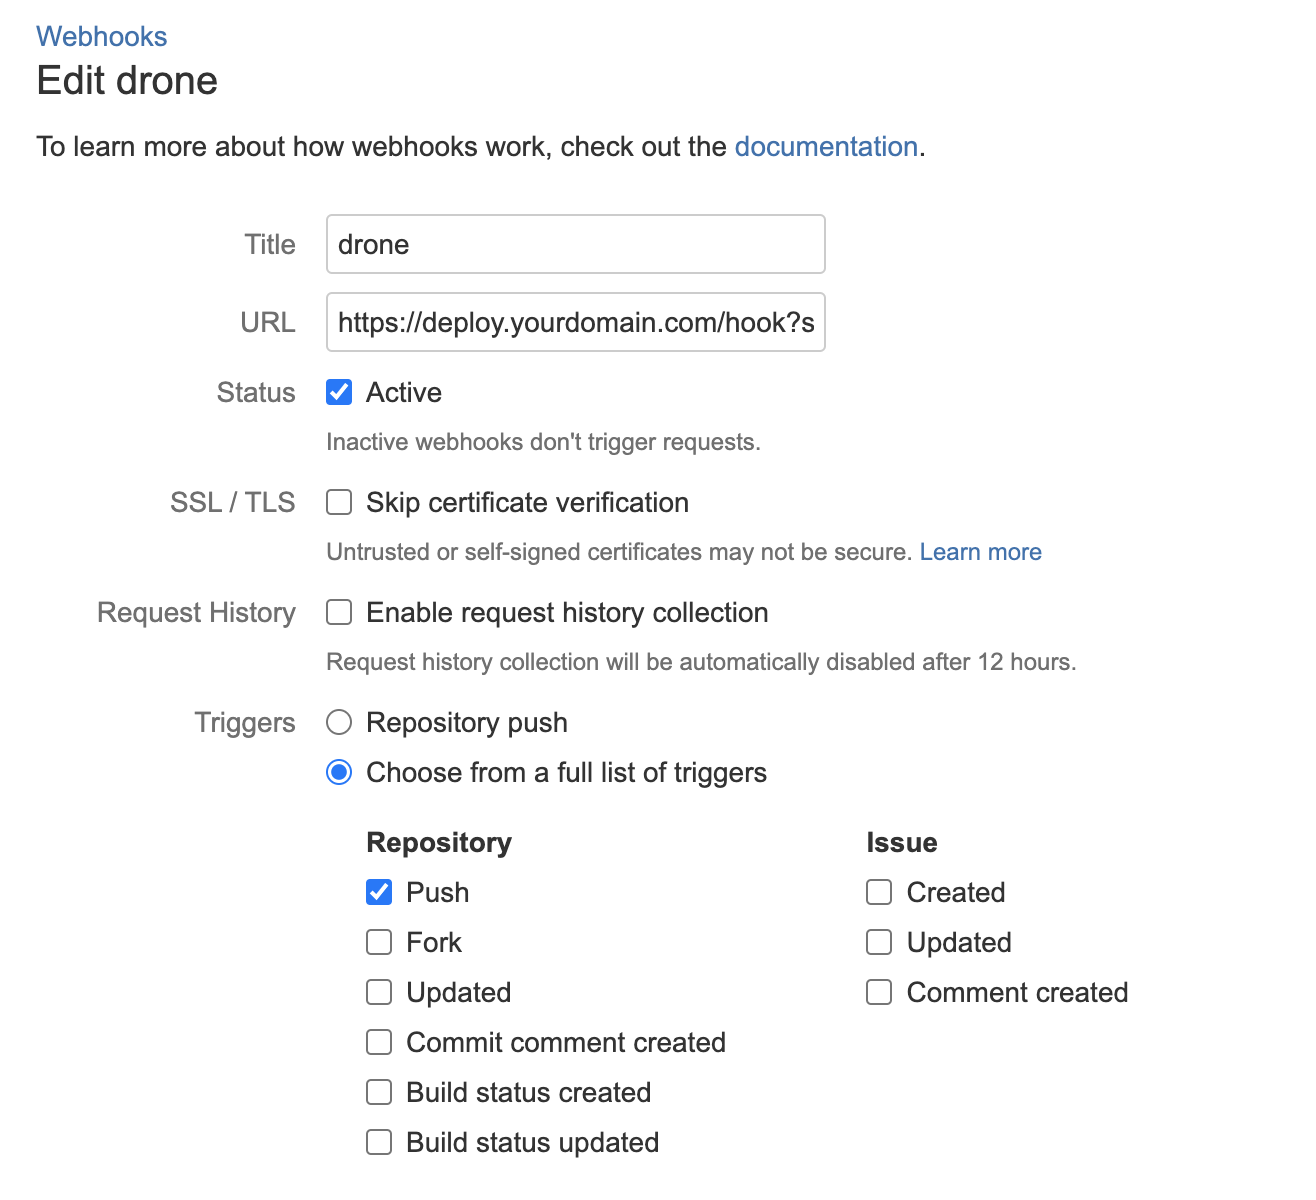
4) Check the webhook
When you activate your repository, Webhook is automatically added to your version control system. There is no manual configuration required.
When you push code to your repository, open a pull request, or create a tag, your version control system will automatically send a webhook to CI/CD manegement which will in turn trigger pipeline execution.
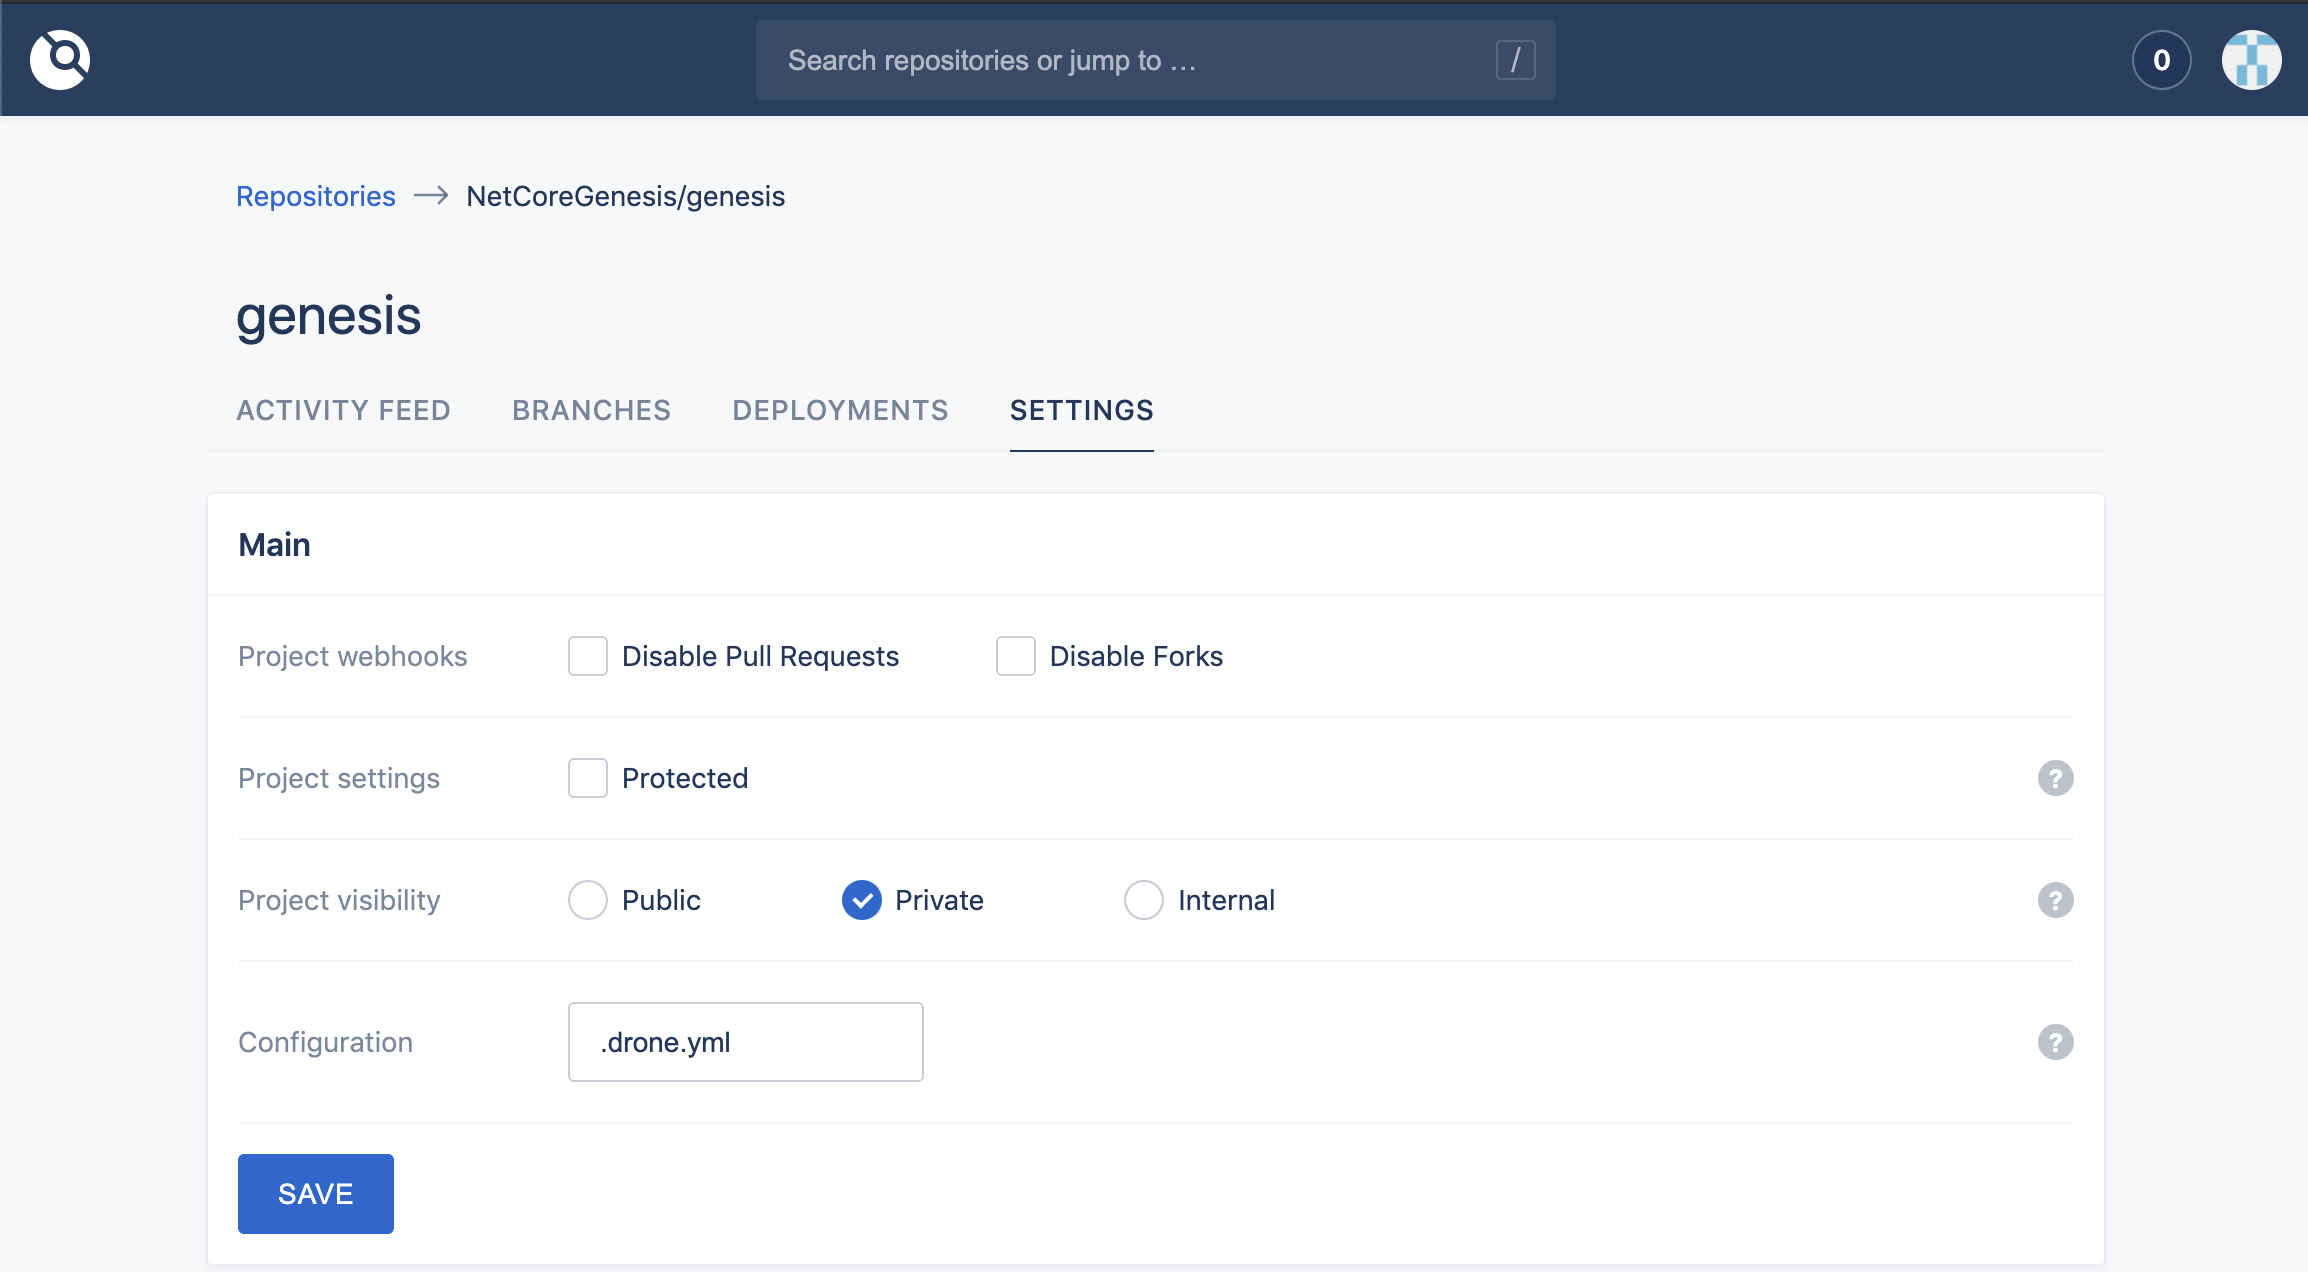
You should see the settings similar to this (can be differ according to the source code management provider):
CI/CD Administration Panel
CI/CD Settings for drone.yml to manage the deployment process (will be hosted at https://deploy.yourdomain.com)
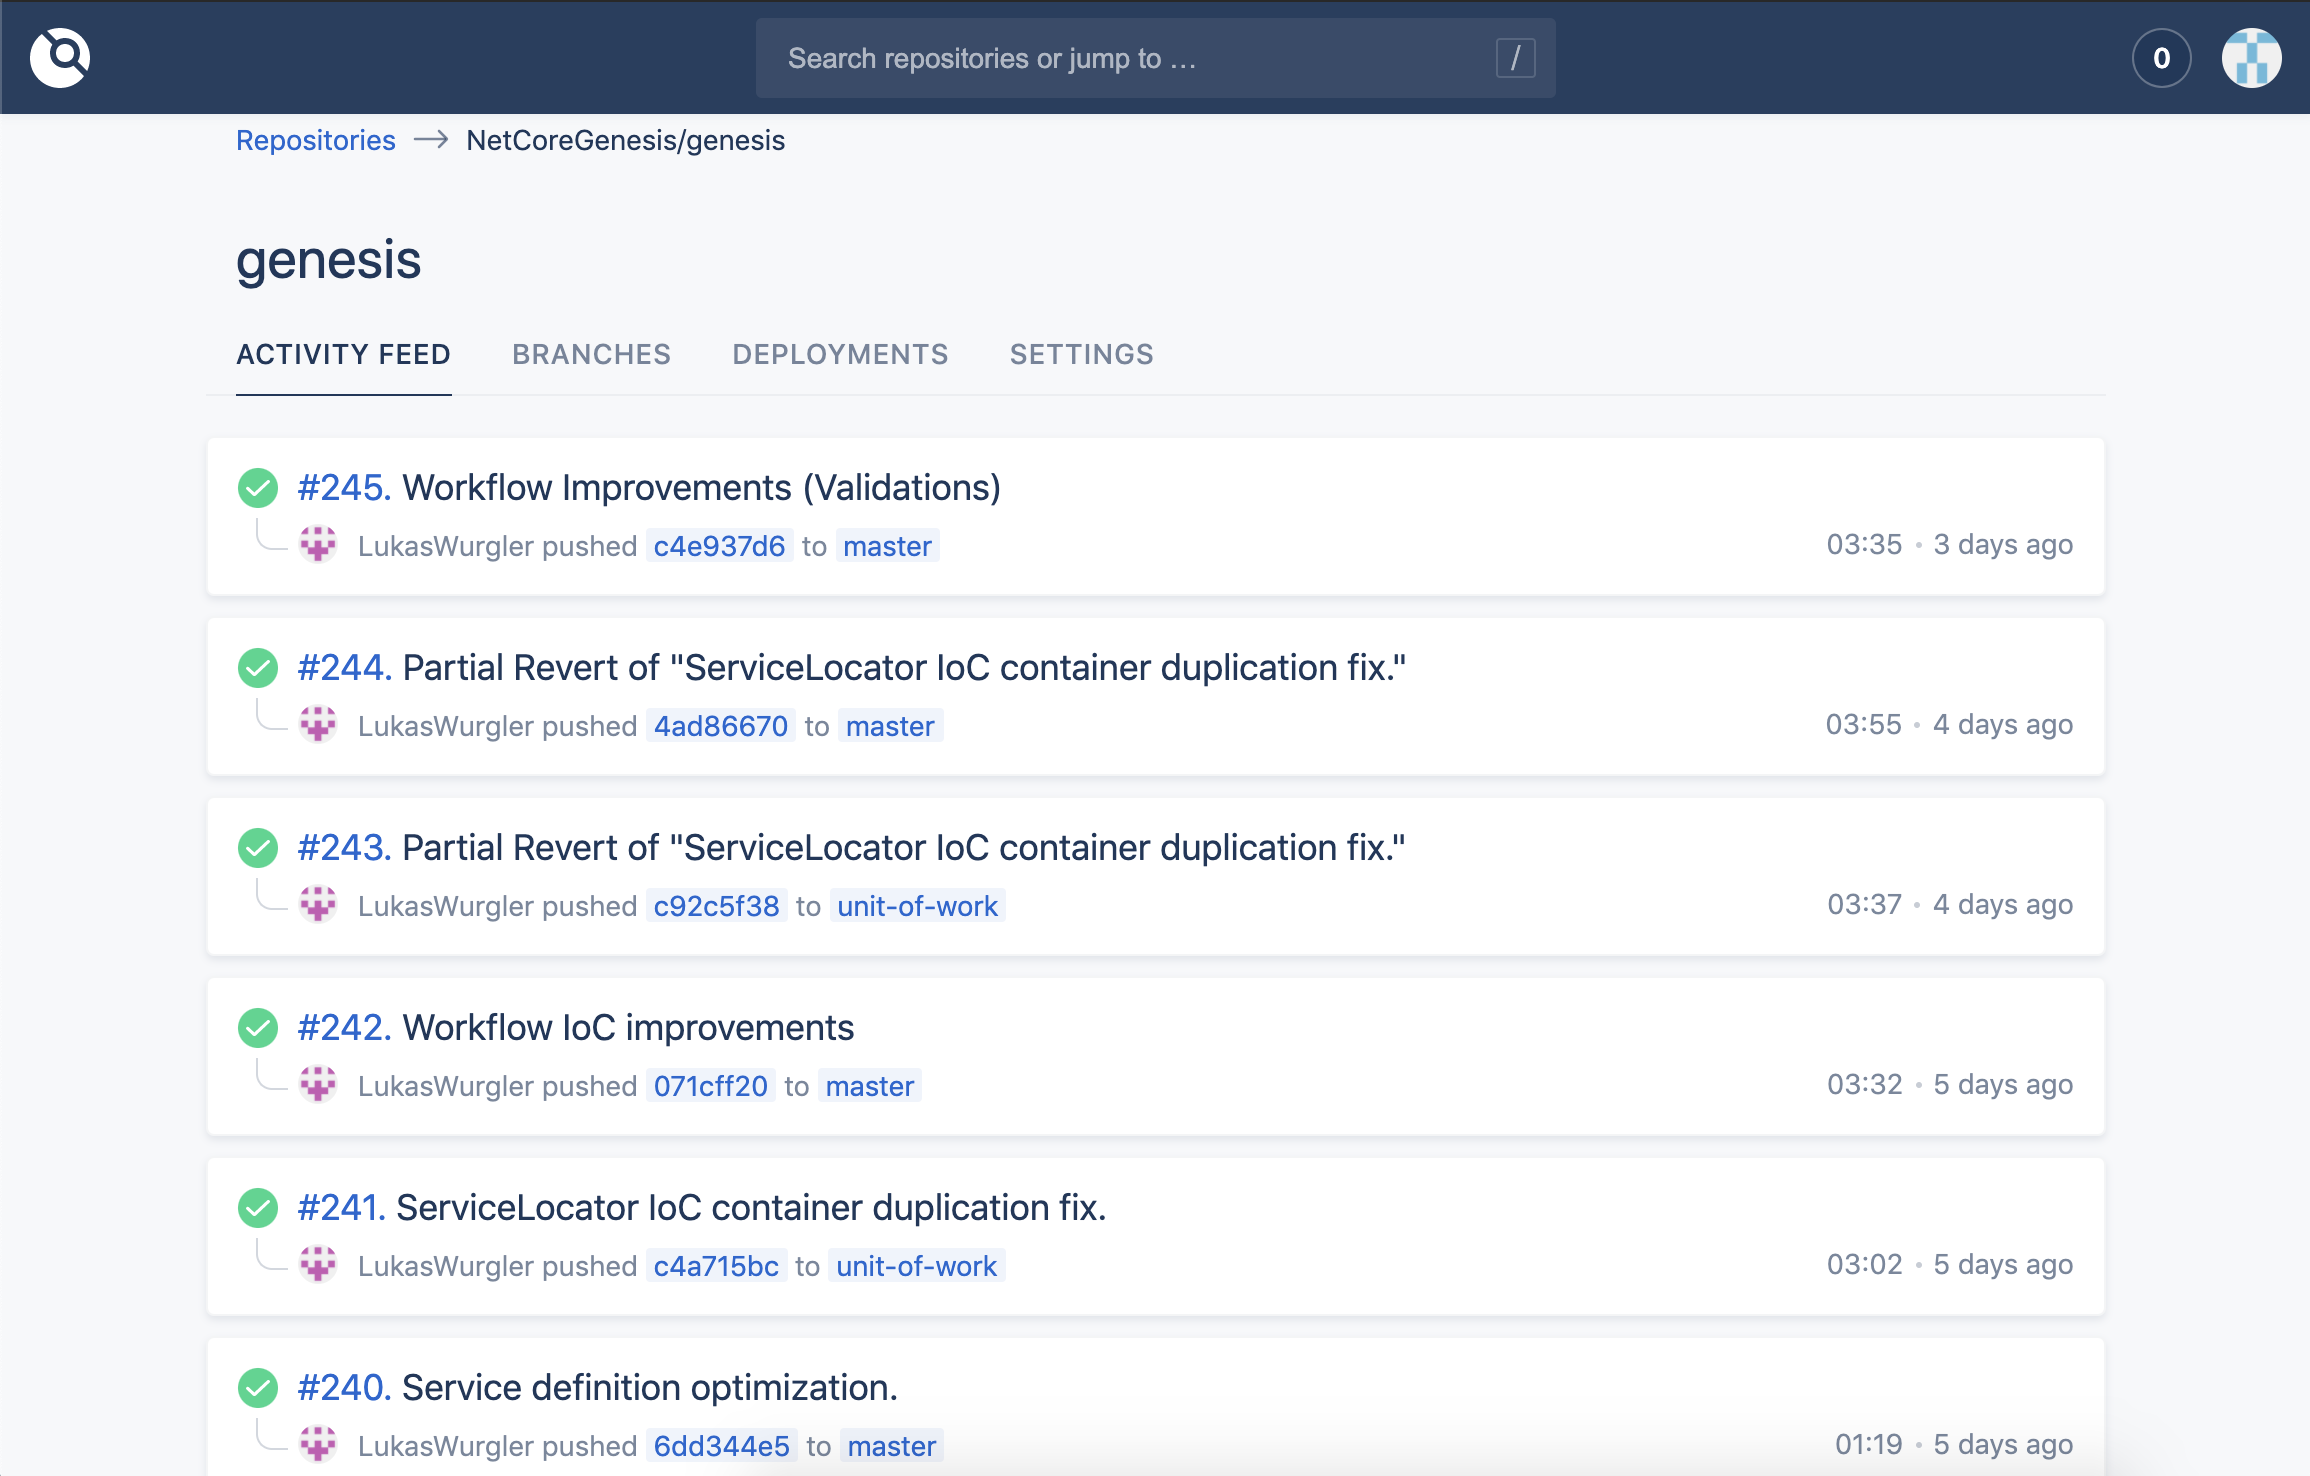
Activity feed which lists the commits and related deployments
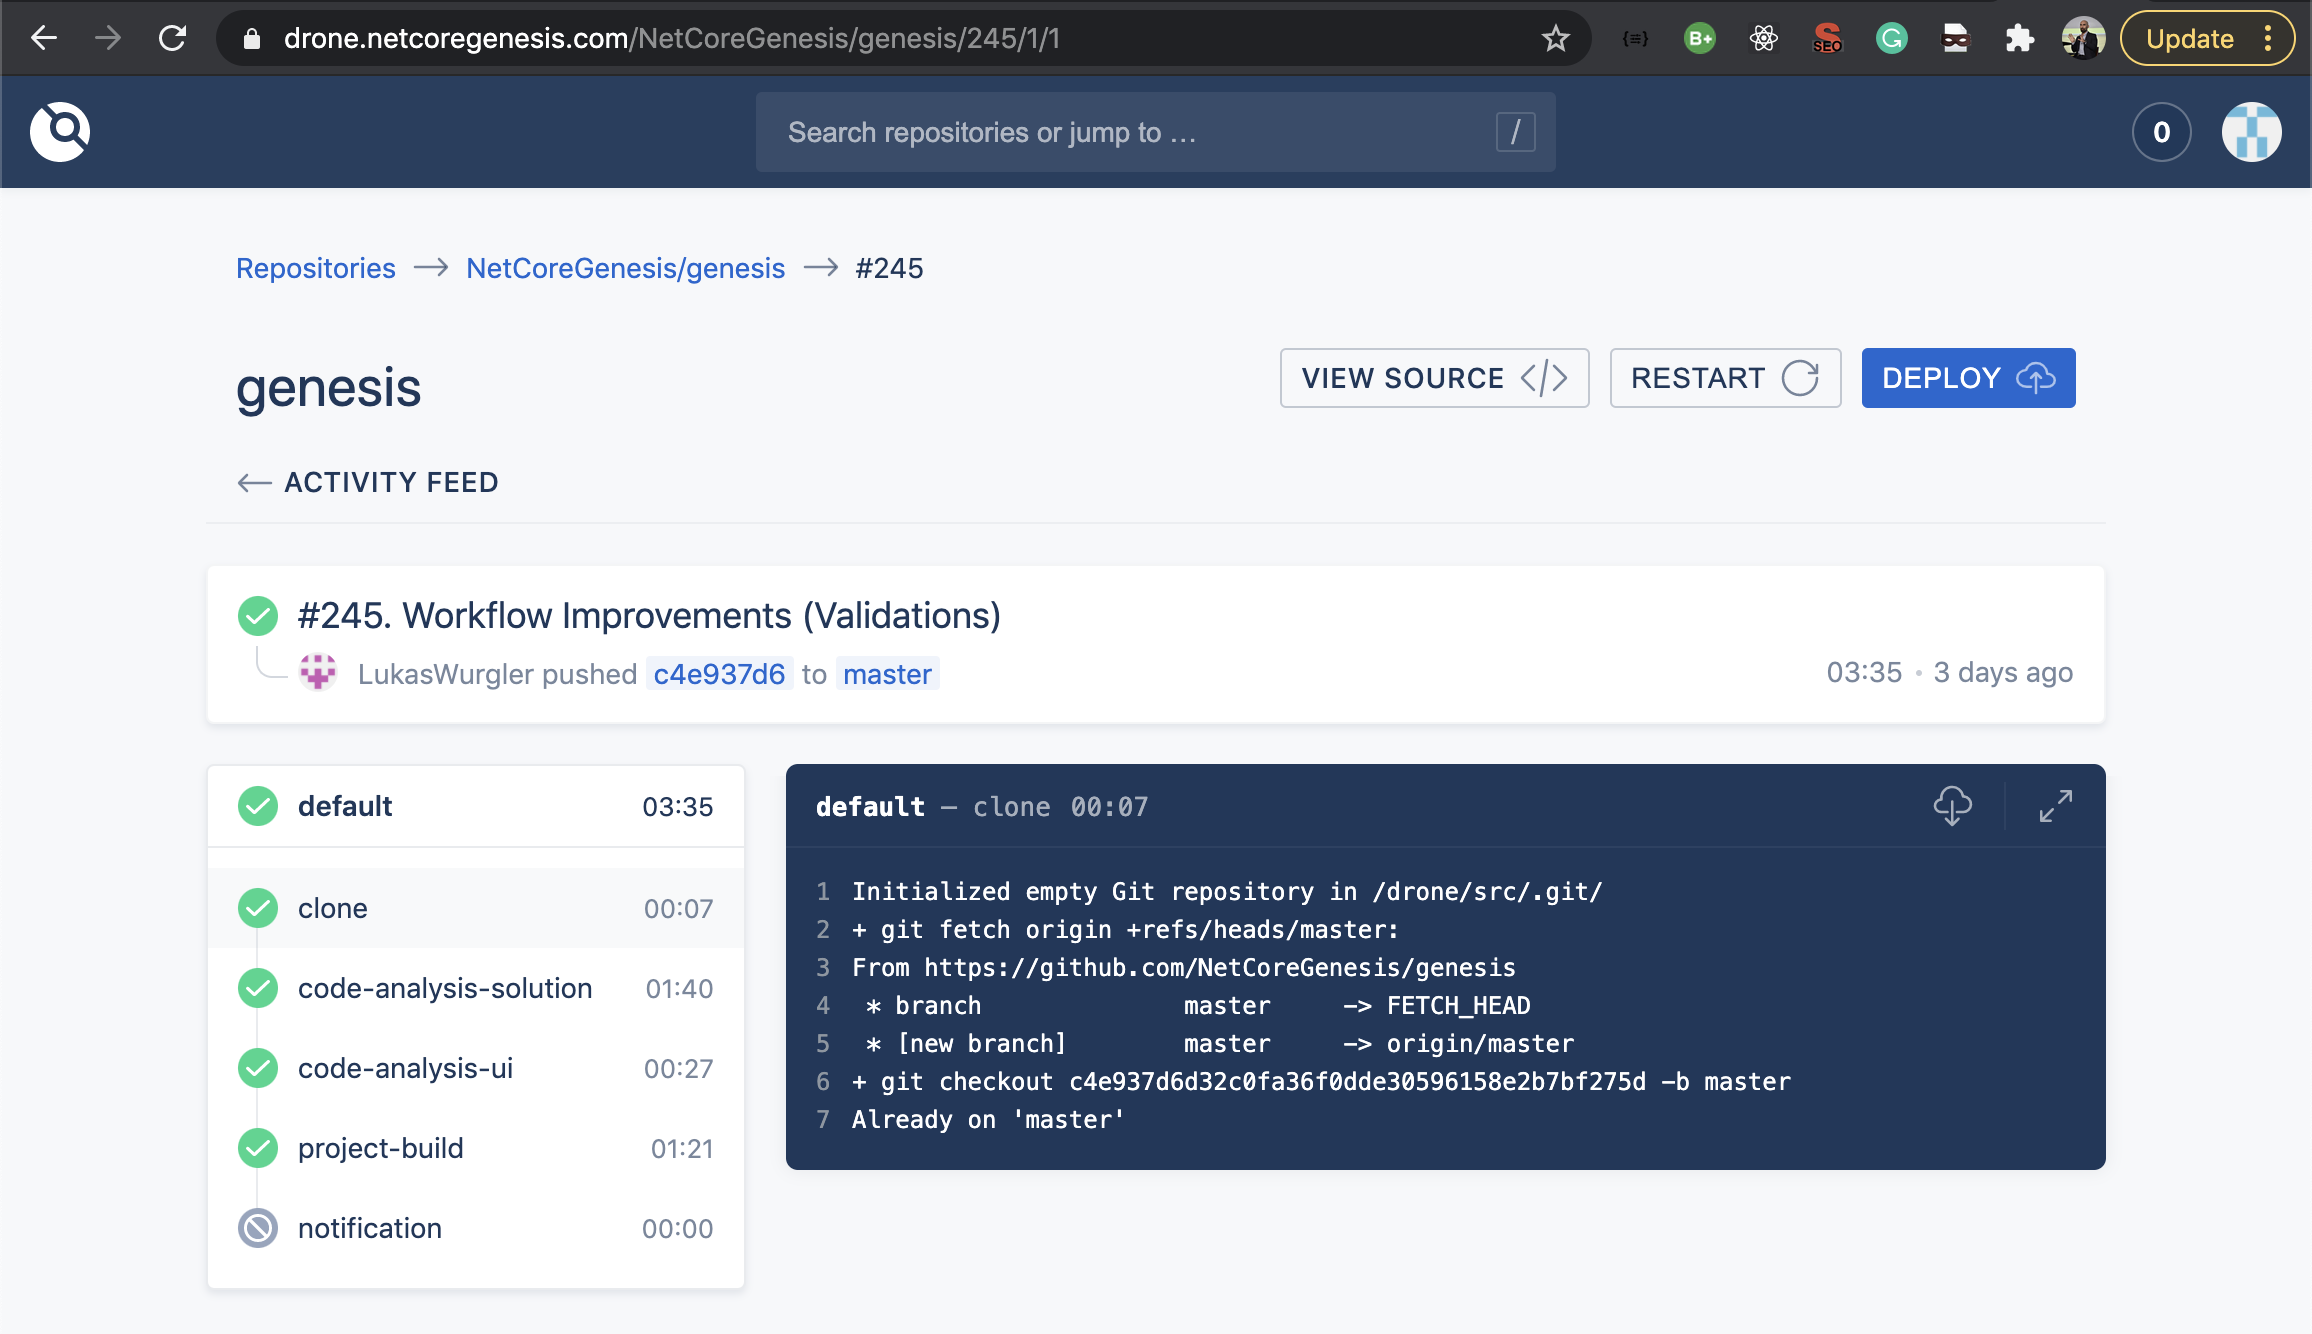
A commit's deployment process and its steps
Understanding the .drone.yml File
The .drone.yml file is the most crucial element of the deployment pipeline.
CI/CD pipeline looks for a special .drone.yml file in the root of your repository for the pipeline definition. The pipeline definition file consists of steps that are executed sequentially upon conditions and triggers.
What is YAML?
YAML (Yet Another Markup Language) is a human-readable data-serialization language. It is commonly used for configuration files and in applications where data is being stored or transmitted.
YAML has a minimal syntax which intentionally differs from SGML. It uses both Python-style indentation to indicate nesting, and a more compact format that uses [] for lists and {} for maps making YAML a superset of JSON.
.drone.yml Template
Let’s go over a Genesis installation and deployment .drone.yml file by understanding its steps:
Prerequisites
- Install and setup a server to host
- Prepare folders, system services and web server configuration
Basic rules:
- Tabs are NOT allowed in YAML. You should use space for indention
- Though the amount of space doesn't matter as long as the child node indentation is more than the parent, it is a good practice to keep the same number of spaces
- There must be space between different elements of YAML
- YAML is case-sensitive
- YAML file should end with extensions like .yaml or .yml
- YAML allows UTF-8, UTF-16 and UTF-32 encoding
To get familiar with Yaml and pipeline configuration, check https://docs.drone.io/pipeline/overview/
Edits in .drone.yml:
- Each {...} is a variable that should be changed according to your project and namings
- Repeat the specified steps for each microservice
- Don't set passwords as clear text, instead define them at your CI/CD Admin Panel -> Repository -> Settings -> Secrets
- Any condition including branch, tag, action and so on can be controlled for each step
kind: pipeline
name: default_deployment_pipeline
#trigger: # trigger when the branch is test or release
#  branch:
#    include:
#      - test
#      - release

steps:
  - name: admin-ui-restore-cache # cache files/folders to a locally mounted volume
    image: drillster/drone-volume-cache
    volumes:
      - name: cache
        path: /cache
    settings:
      restore: true
      mount:
        - ./UI/node_modules
        - ./UI/yarn.lock

  - name: project-ui-build
    image: node:14.4.0
    commands:
     - export CI=false
     - node -v
     - npm -v
     - yarn --version
     - cd UI
     - echo '***** UI Packages Install *********'
     - yarn install
     - echo '***** UI Rebuild *********'
     - npm rebuild node-sass
     - echo '***** UI Production Build *********'
     - yarn build

  - name: project-backend-build
    image: mcr.microsoft.com/dotnet/core/sdk:latest
    commands:
      - pwd
      - rm -rf /drone/src/output
      - mkdir /drone/src/output # create temporary folder to store the assemblies
      - ls -la

      - echo '***** Copy UI Build files to Temporary Folder *********'
      - cp --preserve=links -a UI/build/. /drone/src/output/ui/

      - echo '***** Admin.Svc Build Phase *********'
      - cd ./Admin/Admin.Svc
      - dotnet publish -r linux-x64 -c Release -o bin/Release/linux-x64 --self-contained false
      - echo '***** Admin.Svc Copy to Temporary Folder *****'
      - cp --preserve=links -a bin/Release/linux-x64/. /drone/src/output/admin-svc/
      - echo '***** Admin.Svc assemblies copied to Drone server !*****'

      - echo '***** Microservice Build Phase (Repeat for each Microservice API) *****'
      - cd ../../Microservice/{Microservice}.API
      - pwd
      - ls -la

      - dotnet publish -r linux-x64 -c Release -o bin/Release/linux-x64 --self-contained false
      - echo '***** Microservice Copy to Temporary Folder *****'
      - cp --preserve=links -a bin/Release/linux-x64/. /drone/src/output/{Microservice}/
      - echo '***** Microservice assemblies copied to Drone server !*****'

      - echo '***** IdSvr Build Phase *****'
      - cd ../../IdentityServer
      - pwd
      - ls -la

      - dotnet publish -r linux-x64 -c Release -o bin/Release/linux-x64 --self-contained false
      - echo '***** IdSvr Copy to Temporary Folder *****'
      - cp --preserve=links -a bin/Release/linux-x64/. /drone/src/output/idsvr/
      - echo '***** IdSvr assemblies copied to Drone server !*****'

      - echo '***** Output Content !*****'
      - cd /drone/src/output
      - find .

  - name: scp-securecopy-build-folders-to-host # copy and transfer build folders/files to the host
    image: appleboy/drone-scp
    settings:
      host: {HostAddress}
      username: {SSH_UserName}
      password:
        from_secret: {SSH_Password} # dont set as clear text
      port: 22
      command_timeout: 30m
      strip_components: 3
      rm: true
      target: /var/www/{ProjectName}
      source: /drone/src/output/*

  - name: app-start-services # restart API services and Web server
    image: appleboy/drone-ssh
    settings:
      host: {HostAddress}
      username: {SSH_UserName}
      password:
        from_secret: {SSH_Password} # dont set as clear text
      port: 22
      script:
        - 'sudo systemctl restart {identity.yourdomain.com.service}'
        - 'sudo systemctl restart {adminapi.yourdomain.com.service}'
        - 'sudo systemctl restart {api.yourdomain.com.service}' # repeat for each microservice
        - 'sudo nginx -s reload' # reload Nginx web server

  - name: email-notification # send email notification if fails
    image: drillster/drone-email
    settings:
      host: {Host}
      port: {Port}
      skip_verify: true
      username: {Email_UserName}
      password:
        from_secret: {Email_Password}  # dont set as clear text
      from: {FromAddress}
      recipients: [ {RecipientAddress1}, {RecipientAddress2} ]
      when:
        status: [ changed, failure, success ]

volumes:
  - name: cache # caches for future deployments to get faster results
    host:
      path: /tmp/cache/${DRONE_BRANCH//\//}
Online YAML tools can be used to validate, such as https://codebeautify.org/yaml-validator